To: Captain Auren Tileh (USS Isandlwana) @Burgundian
CC: Captain Kro’nch (IKS Maht-V’o) @kermit
Rear Admiral Sam Bishop (38th Command) @Sam
From: CMDR Barron, Maikull (USS Sun Tzu) @Maikull
Subj: RE: Joint Training Exercises
Tactical Assessment– Alpha Wargames Assignment

Tactical Assessment Log: Stardate 98635.3 - (By Commander Maikull Barron)
I have been assigned to take Command of the Alpha Scenario #3. My squadron is myself, the Avenger Class USS Sun Tzu, the Tempest Class USS Isandlwana, and the B’rel Class IKS Maht-V’o. Our situational goal is to transport Ground Troop Transport Shuttles to the 4th Planet in the Combat System V774 Tau IV.
Defending the planet, Commanded by Captain Coby Morton, is the Lexington Class USS October, Yorktown Class USS Peacecraft, Nova Class USS Asimov, and Kotar Class IKS Qul Cha’bIp.
We obviously have the disadvantage in both size, and numbers, given the October, and Peacecraft are Dreadnaught-Level ships. It is my assessment given the nature of the other two, that the USS Asimov will remain as support for the larger two vessels, while the more maneuverable Klingon Qul Cha’bIp will be the reaching arm of the defense group.
Individual Ship Evaluation:
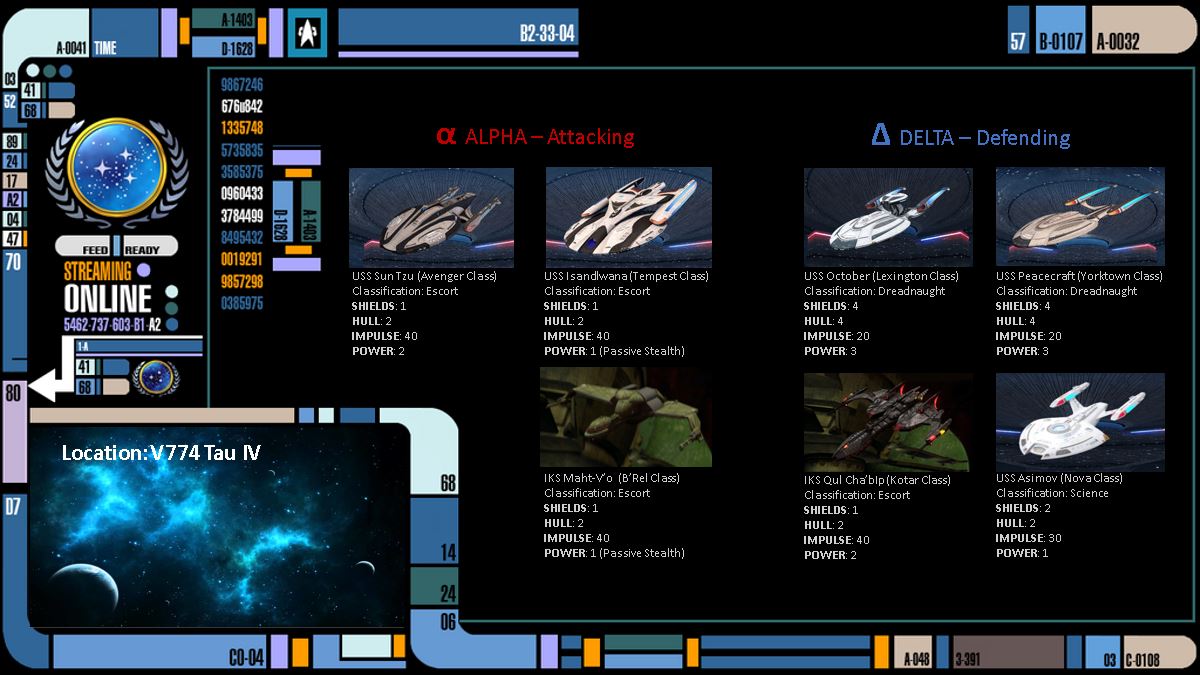
October and Peacecraft
Large and powerful vessels, with plenty of power and operational versatility (Captains Orders). Both ships do not have any passive abilities that drain their power consumption, therefor even by using one of their standard operational commands, they would still have reserve power in place to Return Fire, Perform Evasive Maneuvers, or even Recharge Shields after each engagement (round).
Qul Cha’bIp
A small and quick escort like the ships of my squadron. Its quick, and can use multiple tactical operations at a time. The risk with this ship, is that it could be used to try and flank us, and use its weapons to neutralize our escorted targets. For the training operations, this ship did not include a cloaking device, so it can benefit from its maximum weapons power output. The best option in my opinion is to single this ship out (preferably away from the others) and disable it hard and fast before it can get a shot in edgewise.
Asimov
A small but very versatile support vessel. Its large array of Technical Applications (3 Tech Orders) honestly makes it a very dangerous ship to leave on the field. Its access to Tachyon Pulse renders my squadron’s cloaking ability highly volatile, and as where the two Dreadnaughts have access to the same ability, the Asimov can reveal all of our cloaked vessels in one turn, leaving the others the ability to focus their attention on offensive applications.
Isandlwana and Maht-V’o
Both fast and maneuverable Escort ships. Each both come with a Passive cloaking function (The Isandlwana utilizing ‘Dark-Mode’ essentially rendering her invisible to sensors) but this also limits their power generation down to 1. This does not give them enough functionality to both attack and defend, if necessary, especially given the extremely small shield power afforded to Escort Classified ships in this scenario.
Sun Tzu
A fully powered Escort. With two tactical applications afforded to us per round, Fire at Will can increase our Power to 3, affording us 2 attacks per turn, with 1 power remaining for shield regeneration, or evasive maneuvers if need be. (Or just a single free attack with 2 banked powers for a defensive run)
Fire to Disable not only increases the damage of a single attack (1 power = 2 damage) but upon a hit, permanently reduces shield capacity of a ship by 2. In essence, a single escort landing a hit on Qul Cha’bIp or Asimov can permanently disable their shield arrays. (Or if we hit them with shields down, will shut down their power grid completely, leaving them dead in space, and essentially defeated.) The same concept can be said if we were able to get a 2 on 1 engagement with one of the Dreadnaughts.
Weapons Overcharge is a good way to bypass Shields, and help whittle away Hull Integrity. Again, two Overcharge hits can remove the Cha’bIp or Asimov from play entirely, but completely relays on us having a 2v1 engagement against them.
Operational Evaluation.

We have two ‘Win’ conditions afforded to us.
- OPTION 1: All enemy forces are disabled/destroyed, and at least 1 Troop Transport reach the surface.
- OPTION 2: All THREE Troop Transport reach the surface. (Regardless of opposition’s status)
In this, Option One, (while not favorable), appears to be the key win goal here, as the loss of even one transport would make that our only viable option for success. If an opportunity arises to slip all three transport shuttles to the surface while we -tie up- the defending team, we should take it, however tactically speaking we should focus on the long engagement and disabling of all defending forces.
Scenario 1:
This is dependent on the opposition ‘camping’ the planetary surface. If the Two Dreadnaught Ships, and their subsequent support craft lay in wait, using their Escort to scout or engage us. Two Alpha Escorts should engage the Delta Escort, outside of weapons range of the other three vessels, and utilizing a Fire-At-Will and Fire-to-Disable combo, completely take the escort off the playing field. Sun Tzu with its higher power generation should be in this forward assault group, to give an extra shot incase the Delta Escort proves ‘slippery’ if not all three (with the rear ship acting as defense for the three transports). With that out of the way, we need to see if we could ‘Bait’ one or more of the defending ships away from the planet.
-
1.A. - If one ship (high probability of a dreadnaught) engages, once again, use our speed and overwhelming firepower to overwhelm it. Fire-At-Will and Weapons Overload can help us chip away at its hull integrity quickly, causing it to retreat or be disabled.
-
1.B. - If two ships (Dreadnaught and Asimov) engage, the primary focus will be on the Asimov (Which is the fundamental goal) with it disabled, the cloaking abilities of both the Isandlwana and Maht-V’o become more viable options while the Sun Tzu utilizes all available power to ‘tank’ the dreadnaught while the other two perform Alpha Strikes (De-cloak Shots) to disable it.
Whichever secondary scenario occurs, we will perform the alternate at planeside. If at all possible, if both ships are tied up in engagements (And all three Alpha Team ships remain) an extra ship should take in all three transports and run its way to the planet while the other two act as shield guard. (However, it’s still highly recommended that the Support Vessel be taken out before trying this.)
Scenario 2:
This is to account for a possible ‘open engagement’ where the Delta Team decides to meet us head on. In this scenario, we spread and scatter. Our ships are far quicker than most of the Delta Team, so by splitting ourselves we can divide them as well. The only ONE ship that could catch up to us would be the Delta Escort. I would surmise that they would split into a Dreadnaught-Support, and Dreadnaught-Escort paring.
-
2.A. – if we are looking at a 2-2 split, that means ONE of us will not have a tail and should proceed at max impulse (or utilizing capacitance cells) to race their transport to the planets surface. The other two should use their speed to try and stay out of weapons range. Once the transport has been sent to the planet, the extra ship will meet with the Alpha Ship in 2.A.(2) and aid in evasion or disabling of the vessels.
-
=======2.A.(1) – The ship engaged by the Dreadnaught-Escort combo, You can outrun the Dreadnaught, not so much the escort, so try to draw the Escort out of the Dreadnaught’s Weapons Range and disable it to the best of your ability (Disregard G.R.E. if you think you can take it out solo and still evade the Dreadnaught’s fire)
-
=======2.A.(2) - The ship engaged by the Dreadnaught-Support combo, You can outrun them. DO so until the secondary alpha escort arrives, and focus attention on the support craft first. Dependent on your distance from the target, you could even swap places with the ‘Freed’ escort, and deposit your own transport while the reliving escort harasses the perusing vessels.
-
2.B. - If Delta breaks off into a 1-1-2 split, I foresee them splitting into a Single Dreadnaught Pursuer, and an Escort/Support combo. This is actually a very bad position for us to be in. As where two of us will be fine (again, the Dreadnaughts aren’t going to catch us), the escort/support vessel is a dangerous combo for a single Alpha Escort to face alone. The Delta Escort is no encumbered by passive systems, so between that, its own Fire at Will, and the Support Craft’s Auxiliary Power, it can dish out a deadly volley. This is one of the key reasons I feel its so important to Disable their Support Craft early. In the event of this occurrence (and I pray to the gods its against the Sun Tzu) Run. The other two craft should draw the Dreadnaughts as far off as they can before doubling back and aiding the 2v1 Alpha Escort. If we can manage to disable the Escort and Support craft, we can draw out and pick the Dreadnaughts one at a time.
General Rules of Engagement:
Escorts are Fast, and Escorts can hit hard, but one thing we are, is a GLASS CANNON. One Shield Point, and Two Hull Points, and no means among us to repair our Hull should we be damaged. We cannot play ‘fast and loose’ and take too many risks, especially in the beginning of the engagement. So I have formulated a few Directives for each ship to adhere to, which should help better our odds.
Do Not Cloak –
With cloak active, you have no shields, and with only two hull points the Delta Escort, or Delta Dreadnaughts can EASILY take you out in a single volley with Fire at Will, or Overcharge Weapons. This is because their Support Craft can use Tachyon Pulses to reveal our position, allowing the other three the ability to fire at us. Now, the Dreadnaught’s can do this too, but utilizing a Tachyon Pulse means they cannot attack us, so for them it is a gamble, while the Support Craft can just sit there and keep the field open for them. Once the Delta Support is down, cloak becomes a viable option, but not before then unless an opportunity arises to leave the support craft open for a hit.
Do Not Exert All Power –
My ship has two points, but due to your cloak, the other two Alpha Escorts only have one. IF you attack on a round, use Fire at will, which gives you an extra point of power for weapons, and fire with that. KEEP the extra power for defensive measures such as Evasive Maneuvers, or to regenerate your ONE shield point per round. Do NOT return fire, especially if your being engaged by multiple ships. Excess power should be used for Evasive Maneuvers at all costs. (Can’t stop what you can’t hit)
Each Escort has 1 Troop Transport–
Keep a Transport shuttles within your shield grid and have them match your course and speed. With the exception of drawing out or 2v1’s (Where we have an additional Escort available to ‘watch’ them) each ship will have its own, this away if something were to happen to ONE escort, we only lose ONE transport, and not multiple.
Final Thoughts
Something to keep in mind is that their goal is to stop the TRANSPORTS, not us; as where we have the infantry more difficult task of barreling through them completely. We protect them with our shield grids, and barring that, with out very hulls if we have too. I don’t -WANT- to put us in a situation where we have to choose between out protected targets, and our crew, but if an opportunity arises where one of our ships can slip past and make it to the planet with all three transports, even if it’s at the cost of the other two…Do it. If you find yourself on the receiving end of a ‘killer blow’, use the last amount of power on a “Return Fire” and do as much damage as you can before you are eliminated.
This is a training simulation, but its to simulate war…The craft we are escorting could prove invaluable to the people on that planet, and could affect a save infinitely more than our own crew complements. We would not be asked to undertake such a daunting trial if that were not the case, so please don’t think I am suggesting sacrificing crew or ships lightly, but in the face of victory and accomplishing our goal; if we are to die, then let us die for a greater purpose.
I thank you for the time to read and consider this tactical assessment, and wish us all the best of luck in our engagement tomorrow. If you have any thoughts or considerations on the matter, please feel free to share them here, I am sure to be burning the midnight oil until I feel confident of our mission’s success.
With Respect,
//SIGNED//
Maikull Barron
Commanding Officer,
USS Sun Tzu
—
//ATTACHMENT// ship-review-screen.source
//ATTACHMENT// system-review-screen.source